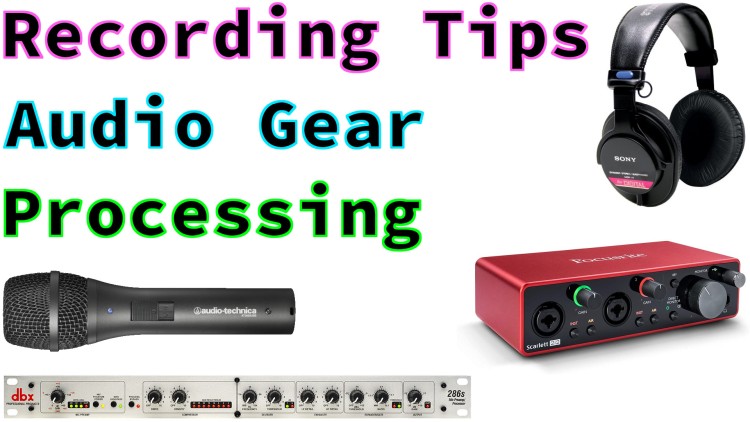
How to Record Great Sounding / High Quality Audio at Home
You could use these tips for remote interviews, code pairing, talks, podcasts, live streaming, YouTube videos and creating courses.
Quick Jump: 25+ Rapid Fire Tips to Improve Audio Recordings | Which Room You Decide to Record In | Controlling Ambient / Background Noise | The Human Element, AKA You | Audio Gear and Software | Practice, Practice, Practice
Prefer watching video? I recorded a 90 minute video on YouTube (no ads) which goes over this whole post in detail and it includes audio samples with the gear I use. I’ve also referenced those samples in this post if you prefer reading.
Since about 2015 I’ve been doing a variety of things where having nice sounding audio is important. That includes recording 400+ videos and 70+ podcast episodes. I’ve also given a few live talks and constantly do remote calls for freelance work.
While doing that, I spent at least 75 hours dedicated to researching audio and playing with different combinations of hardware, various settings and a bunch of other things that help produce clean audio when talking into a mic. We’re going to cover all of that in this article.
As a software developer I think even if you don’t plan to record videos, it’s still helpful to have good sounding audio if only for doing remote work. Your co-workers will appreciate it. If you’re not a developer and you’re reading this, that’s no problem. This post applies to anyone wanting to record high quality audio.
Also, this isn’t just another “hey, go buy $750+ worth of audio equipment” post. Most tips apply to anyone with any type of audio set up in any home environment. You won’t have to do expensive sound treatments or spend any money in a lot of cases.
But with that said, there will be a section on headphones, microphones, USB audio interfaces, processors and other audio hardware suggestions if you do want an upgrade or 2. This could range from a $70 USB microphone to a few hundred bucks depending on what your current recording situation is like and what your expectations are.
In general high quality and good sounding audio comes from a combination of:
- Which room you decide to record in
- Controlling ambient / background noise
- The human element (how you speak, positioning, awareness, etc.)
- What type of audio gear and software you use
Focusing all of your energy in 1 area won’t necessarily give you the best results. There’s a balance to it all. That’s why dumping $750+ into audio equipment is pointless if you have tons of low hanging fruit that can be fixed in other areas.
We’re going to cover all of the above bullet points in detail but for now…
25+ Rapid Fire Tips to Improve Audio Recordings
These tips are the TL;DR version of combining the 4 bullet points above. I’ve experienced all of these things personally in the past or have encountered them in remote calls.
This is a list of things I’ve written up and sent to podcast guests in a “show preparation” email since I started the Running in Production podcast. I’ve repurposed them here and made them a bit more general purpose.
Not everything is going to apply to every situation and you don’t necessarily need to follow everything. Basically use your best judgment and look for the biggest wins that take the least amount of effort and can also be applied to your situation.
Here they are in no specific order:
If you can, try to find a quiet room. Big open rooms with little furniture, hardwood floors and high ceilings can create a lot of reverb with a non-optimal microphone. We’ll go over how to make this type of room usable later on.
Disable all types of sounds from your phone and put it in a different room because even vibrations (especially on your desk) will be super loud over the mic.
Turn off notifications on your computer so you don’t get startled or distracted by something unexpected.
Try to shut down most things on your computer so your recording tool can run in peace without a CPU or disk I / O intensive program stealing resources. This can be an issue even on a powerful machine.
If you’re standing on a hardwood floor with flip flops or slippers try not to shuffle or slide your feet around. It will make a lot of noise.
Do you have a squeaky chair? Is there any way you can swap it out for one that doesn’t make noise just so you don’t have to think about it?
Be mindful of your clothes in relation to your desk and other things. An unzipped jacket or hoodie can easily fling an empty water bottle off your desk if you move your arm. I’ve done this like 6 times in remote calls by accident at a standing desk. :D
Be mindful of your mic rubbing against your collar or shirt if you use an earbud + mic combo or happen to have a clip-on mic. That will create a lot of brushing / crackling / distorted sounds which can’t be edit out later.
Try to avoid wearing things like a track suit or a shiny jacket / shirt because if you adjust your arms a lot it’s going to cause a lot of rustling sounds.
Be aware of your headphones cable. If it’s constantly moving on your desk it will come through into your mic. Also be careful not to rip it out if you have a chair and roll over it (been there done that!).
Be mindful of things that can turn on / off on their own like air conditioners, fans, fish tanks and super loud computer fans. If it’s safe you should turn all of these things off during the recording if you can. We’ll address how to minimize these sounds later.
Be mindful of your breath. Try not to breathe heavily directly into the microphone, but don’t forget to breathe too! We’ll go over tips on how to control this later.
Do you have a window in your room? Definitely close it, as all sorts of outdoor noises will be heavily amplified with an open window.
Do you have pets that can potentially make noises? If so would it be possible to keep them in a separate room during the recording without putting them in danger or causing them to go berserk and scratch at your door?
Do you have children that could potentially interrupt you? You don’t need to lock them in a closet, but is there someone else in your house that can temporarily attend to them?
Do you have children or large pets that will run around loudly above, below or next to your recording room? That may cause vibrations and other noise that your mic will pick up.
Be mindful of doing laundry during the recording because washing machines and driers are super obnoxious and tend to vibrate so much that it will resonate through an entire house, up into your room / desk and then your mic will pick it up.
If you have room mates or someone else living with you, give them a heads up and ask them not to open or close garage doors or slam doors during the call.
Be mindful of potential ticks. Some folks spam click their mouse or slide and tap their fingers on their desk without thinking about it. All of these things can kill a recording since they can’t cleanly be edit out if you’re talking at the same time.
If your neighbor is going to throw a party during a scheduled call consider rescheduling. This also goes for a big town event (parades, fireworks, etc.), landscaping services with massive leaf blowers, tree cutting services or your town re-paving your road. All of these things are deadly for a recording.
If something unexpected happens like a loud plane, helicopter, train, fire truck, sirens, etc. then try to finish your sentence and stop talking. Wait it out and repeat the last sentence. Eventually you’ll know what sounds don’t get picked up that you can ignore.
During long stretches of talking, be aware of your system going to sleep after idling for 10 or 20 minutes. You should move your mouse every once in a while to avoid your system from sleeping.
Try not to type unless you have to because key presses could be quite loud unless you have a solid recording set up with a mic boom arm. We’ll go over ways to minimize keyboard sounds later on in this post.
If you have good headphones be mindful of them being so loud that they echo back into your own mic. I tend to use low powered earbuds when doing podcasts with guests to avoid this. It makes a big difference.
If you have more than 1 mic hooked up to your computer and you’re recording something, double check to make sure your good mic is set as the recording device.
Don’t eat or chew gum. All sorts of gross mouth noises will make its way into the recording. The sound of bags rustling or cans opening can be tough to edit out too.
Do stay hydrated. Drink plenty of water or whatever you prefer. If you have a sensitive mic, turn your head to the side when drinking. Lots of times this is easy to edit out.
Use the restroom right before you’re about to record even if you don’t really have to go. With that said if you need to go during your recording, please speak up and go as necessary because holding it in is going to be very uncomfortable.
If in a podcast scenario don’t apologize for coughing or sneezing when you’re done. They can easily be edit out without anyone ever knowing it happened. Use your best judgment here for doing live recordings in respect to your audience.
Now that we know what to potentially be aware of and how to address common pitfalls let’s go into more detail on how to improve the quality of our recordings.
Which Room You Decide to Record In
Your recording room is pretty important. You can make most home offices or bedrooms sound very good but certain rooms will be much easier to get a good sound out of.
A bad sounding room will have lots of reverb or echoing and will be located near sources of loud uncontrollable noises such as being positioned near a busy street or in a basement near a furnace or things that kick on frequently.
A good sounding room will have practically no reverb and will be positioned in one of the quietest areas of your living space.
Here is a side by side comparison of what a lot of reverb vs practically no reverb sounds like.
These clips were recorded with the same exact audio equipment and settings. The only variable here is the room. With good headphones the difference is mind boggling and we’ll talk more about headphones later.
Also, I’m not claiming my current set up has the best sound quality ever, but for what I’m dealing with room-wise I think it works. The “no reverb” sample from before is a better representation of how nice things can sound with the same audio gear we’ll cover later.
Update: Since this video was originally recorded I changed 1 thing in my room which cut the reverb by a noticeable amount. It was replacing a blanket (more on this later), but here’s a more recent video with the latest audio quality.
There’s no perfect formula on what makes a room good or bad but here’s a bunch of characteristics that typically make things sound better or worse.
Keep in mind that you can make a room that has a bunch of bad sound characteristics sound good too, so don’t lose hope as you read through the list.
My current recording set up is in one of the worst possible rooms for recording but I made it sound good with about $60 worth of pre-made items you can find at Home Depot or on Amazon.
Common Things That Tend to Make a Room Sound Better
- Small in size (5 x 9’, 6 x 10’, etc.)
- Carpeted floor (anything that’s thicker than that cheap basement carpet)
- Having a bed in there (unbelievably good source of sound absorption)
- Open closest doors with hanging clothes (great source of sound absorption)
- Any type of furniture (couch, chairs, bean bags, etc.)
- A multi-layered desk and shelves with books and other things filling up the space
- Anything to break up the room’s shape (plants, typical clutter, etc.)
Notice how nothing on this list is weird or specific to making things sound good. In a typical bedroom or home office / studio combo you could pretty easily obtain all of these things, and in a lot of cases just having a bed or couch in there might be enough on its own.
Common Things That Tend to Make a Room Sound Worse
- Large in size (12 x 14’, 14 x 18’, etc.)
- Angled walls and / or very tall ceilings
- Hardwood floors with no area or throw rugs
- 4 hard surface walls (closet doors that aren’t open, no hanging clothes option, etc.)
- A very minimal desk that has no back side (typical for standing desks)
- Overall minimalism (no furniture, plants, shelves, etc.)
Again, these are pretty common things you could expect to see in an apartment.
The TL;DR on how sound works
The reason this type of room sounds worse is due to how sound works. The TL;DR is sound waves travel through air / water and vibrate individual atoms along the way. This wave makes its way into your ears and then your body takes over from there.
That means when you’re talking in a room, sound waves are bouncing all over the place. You just can’t see them because they’re invisible. That’s also why there’s no sound in large empty regions of space. There’s nothing to vibrate off of.
But when you have a bunch of hard surfaces like hardwood or concrete floors, sound is reflecting off them and the more times it bounces the more reverb you hear. Reverb happens when your original sound signal (ie, your voice) gets reflected a bunch of times. Eventually after enough reflections it will die out, but hard surfaces reflect sound more.
Stuff like beds, carpets and hanging clothes do a great job at absorbing these reflections because they are soft large objects.
As an aside, that’s why if you shout or loudly clap in a room that’s not ideal for recording the reverb effect gets amplified and in much larger areas like a big canyon or a long concrete tunnel you can hear an echo too.
If you’re curious this article explains the differences between reverb and an echo. The TL;DR is they are about the same but reverb is reflected back within 100ms and your ear cannot distinguish the perceived sound from the original if it happened within 100ms. Echos tend to get noticeable after ~55 feet (17m) due to the speed of sound.
Tips to Reduce Reverb / Echos in a Room
My recording room has a bunch of bad properties and if you watched the video linked before you’ll see what it looks like and how I got around those issues using common items you can find at Home Depot. Only 1 of which looks a bit out of place to help reduce reverb.

If you didn’t watch the video. There’s a 5 x 7’ area rug on the hardwood floor to help absorb the sound. Going much larger didn’t seem to make a huge difference for my room size. I tested that by throwing a king size comforter on the floor just to see.
I didn’t link the rug I have because I forgot the brand and I cut the tag off. It was a random thin’ish one I found at Home Depot. You can find area rugs on Amazon for like $30. The brand isn’t important for audio reasons alone. Just pick one that you like with good reviews.
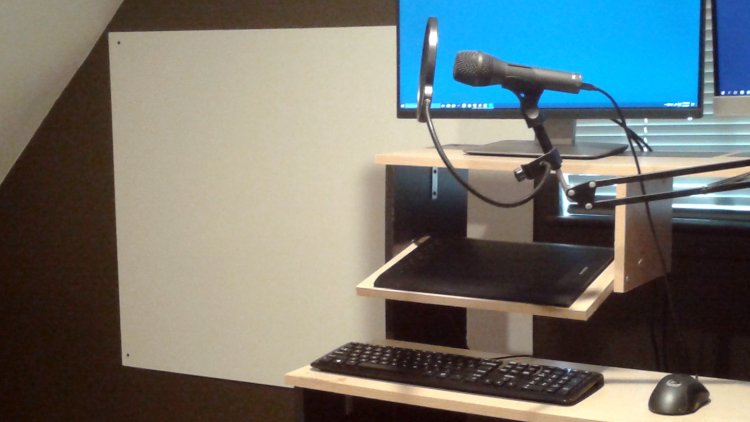
(Slightly outdated) original set up based on the video
To be clear I replaced this moving blanket with a comforter listed below.
The other thing was hanging a single 80” x 72” Sure-Max moving blanket ($30) over my closet doors. It comes in a 4 pack, so you’ll have 3 extras to do whatever you want.
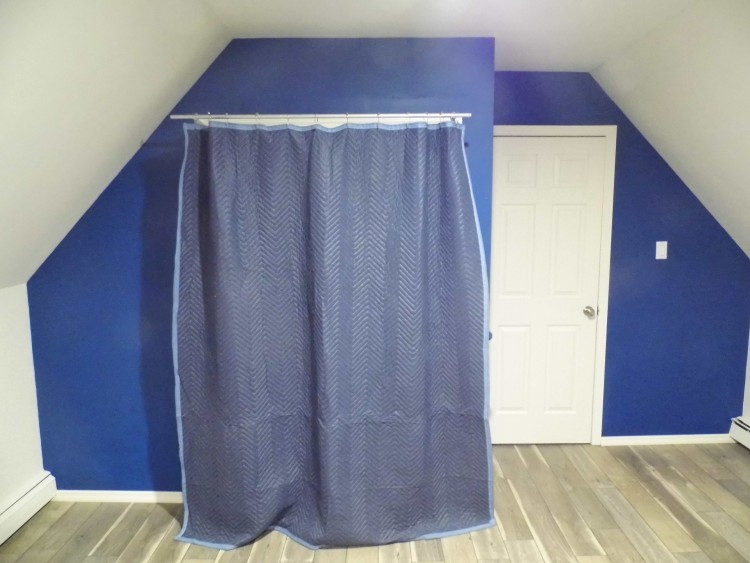
This helped almost equally as well as the area rug. My room was unacceptably bad by having either of them on their own, but when combined together it became pretty good.
It doesn’t look the best but sometimes you have to do what you have to do. It’s also completely out of frame from my webcam so no one sees it anyways.
It’s also on shower curtain rings mounted onto brackets so it’s really easy to scrunch up to 1 side to make it less apparent. The mount creates a decent sized gap between the blanket and the doors to absorb more sound.
If that’s not something you can do you could probably nail them to your wall or use really strong tape. I have a hunch that in most cases you won’t need to go this far. My room was especially difficult.
(Up to date) modified set up based on a recent change
While the original set up wasn’t terrible sounding, it could be improved upon. I happened to see this comforter at Costco ($30) so I picked it up and gave it a shot.
If you don’t or can’t shop at Costco any decently thick comforter on Amazon will do the trick. There’s tons of them in the $25-35 range.
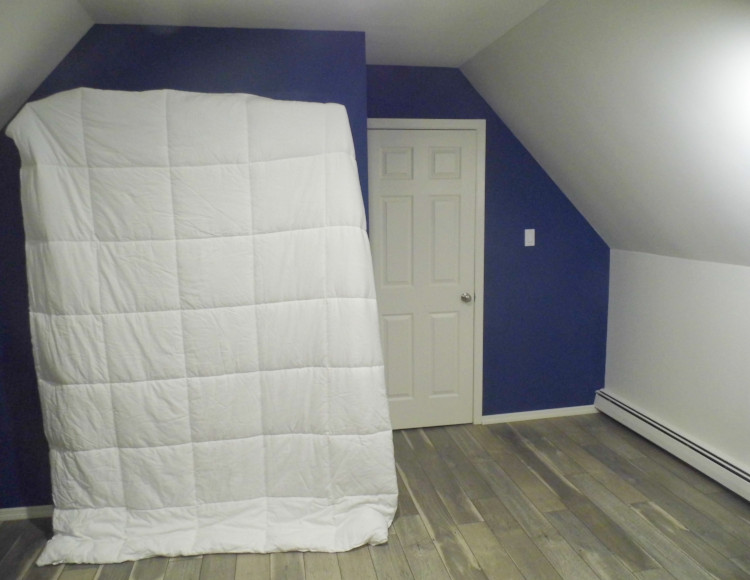
It absorbs sound so much better than the moving blanket. Here’s another video I recorded. It’s programming related but it demonstrates the improved audio quality. It’s quite a bit thicker than the moving blanket and much softer. It’s 50% cotton / 50% polyester.
I was surprised at how much of a difference it made. Even talking in the room normally has noticeably less reverb. It looks a bit bulkier but IMO it’s a trade off worth making.
By the way, I didn’t thread it through the shower curtain rings. Instead I clamped it to the rod using typical clamps you might use to keep cereal fresh. I definitely could do a better job at evening out the top! Although it looks more straight in real life.
Additional reverb reduction tips
Placing things in the corners helps too. Even little things like a backpack can make a small difference and be kind of practical too. Plants are another good option. They could even be fake if you don’t have good sun light in a specific corner.
I also tried putting up a bunch of cheap acoustic foam panels in various spots but this had very little effect. I would say things got about 10% better but it looked bad because of the angled walls. It wasn’t worth it so I took them down.
I went all out with the panels too. One of my friends used to install sound treatments professionally for both home studios and large recording centers. We hopped on a Zoom call and spent an hour mapping out ideal locations for the panels. No dice.
Your mileage may vary and they also come in different shapes, sizes and colors. In some set ups they can look kind of cool, so it could be worth investigating if you determined that you want them.
Sometimes a room’s acoustics are really bad. I’m sure if I added more things to fill out the room and break the shape up it would help but IMO things are good enough now where it’s not an issue, but next on my list would be to try a few plants.
This wouldn’t apply to my room, but another option is if you have a very large window or side door you could use large curtains made of material, like blackout curtains to help cut out reverb on 1 wall. That could look pretty stylish too in some cases.
If push came to shove I could always hang a few moving blankets on a movable rack on both sides of myself with them just out of frame from the webcam. I’m 100% sure that would make the room sound fantastic but it would kill the aesthetics of the room.
I also don’t want there to be any set up and tear down time when I’m about to record. I just want to flip the microphone on and go. That really helps with being productive and staying motivated to record by removing barriers.
How to Make a Decision
Depending on how much you care about your audio quality it may be worth recording in one room over another but sometimes you have no choice due to living in a restrictive apartment so you need to make the best with what you have.
Understand that this is a pretty incremental thing. You don’t need to do everything at once. Honestly in a lot of cases, unless you’re pretty far into the worse sounding spectrum you probably won’t have to do too much to make your room sound good.
But if you do need to take specific steps to make your room sound better, do it 1 step at a time and try to find a balance. Patience really is the key here. It took me about a month before I got things in a decent state, mainly waiting for shipping and trying things out.
Controlling Ambient / Background Noise
Now that we have our room out of the way, the next thing on the list is doing what you can to control and eliminate background noises.
The 25+ tips covered a bunch of things to be aware about such as computer fans or other ambient / background noises but it didn’t really go over how to address some of these things so you don’t need to worry about them anymore.
In programming we have a phrase called garbage in, garbage out. This very much applies to recording high quality audio too.
If your source is coming in noisy then your output is going to be bad too unless you take time consuming and non-optimal steps to reduce this noise. Yes I know there’s machine learning tools out there to help reduce background noise but this always comes at a cost of manipulating your natural speaking frequencies.
Likewise, there’s hardware and software out there called a noise gate that will help reduce or eliminate certain types of sounds from making their way into your recordings. That could be things like background fans or any constant low volume hum. But this also comes at the cost of cutting out your natural speaking frequencies.
Like most things in life, having a healthy balance is very good. For example you might need to use a noise gate at a low setting which helps reduce background hums without really having a negative effect on your natural voice.
We’ll talk more about noise gates when we go over hardware and software choices.
The moral of the story is, if you can pretty easily reduce background noise at the source you should do it because it’ll improve your source signal which in turn will make your recording sound better in the end.
If you have a desktop computer and you’ve put it together from parts then do yourself a favor and get Noctua fans for both your case fans and maybe your CPU’s heat sink fan. They’re only a few bucks more than budget case fans but they are nearly silent while still having excellent cooling (ie, it’s not just spinning at lower RPMs).
Your power supply can also have a fairly loud fan and unless you specifically search for a power supply that’s known to be quiet. IMO you should carefully research this component.
Personally I put together my desktop workstation before I started recording videos so I didn’t do this from the get go but when I build my next machine I will for sure take these considerations into account.
The only thing I’ve done is replace 1 older case fan that died with a Noctua fan. Overall my machine is quite noisy. I mean, I can’t hear it from the next room or anything crazy like that but it for sure comes up in my recordings unless I use a pretty strong noise gate because of my power supply’s fan and 2 other non-Noctua fans.
For the Apple crowd / laptops in general there’s Apple’s M1 line up to look into. I don’t have one personally but if there’s no fans that’s very nice. Also if you have a laptop with a fan you could always dock it somewhere further away from your mic to help cut the noise.
The Human Element, AKA You
You have a very big influence in how your recordings turn out. There were a bunch of things listed out in the 25+ tips section, such as being aware of your clothes, hands, cords, ticks, etc..
But there’s other human elements around creating decent sounding recordings too.
These are things like how soft or loud you’re speaking, your breathing, staying hydrated and how you’re positioning your microphone based on what type of mic you have.
For a lot of folks it takes a lot of practice and I still feel like I don’t have all of these things perfected even after recording hundreds of videos. For others, maybe it’ll come naturally.
I tend to speak louder and faster while recording, I don’t know why. But it kind of wears out my voice if I speak for even 45 minutes straight. Not to the point of losing my voice, but it for sure sounds different than the start of the recording.
So that’s something to be aware of. Try to speak as if you’re talking to a friend from across a table in a casual environment, or just chatting with them from a normal standing distance.
If you don’t have any friends then talk like you do when explaining your programming problems to a rubber duck, except without the rage induced shouting.
Speaking casually and naturally into a microphone is way harder than it sounds.
I think it’s partly unnatural because you need to really trust the gain on your microphone as being a part of your vocal chords and diaphragm. In other words, you don’t need to speak louder to make your recording’s output louder.
You can turn the gain up on your microphone. You are much better off speaking at a normal casual conversation volume and then raising the gain on your mic. But you don’t want to raise it too high because then you might start to get distortion.
We’ll talk more about gain and leveling when we talk about hardware and software.
If you’re not self conscious enough, there’s breathing too. This will depend on what type of mic you have, but you should very much try to eliminate hearing drastic breaths.
In my opinion it sounds very good and natural to keep typical low key inhales and breaths in your recordings but it sounds very bad if you constantly hear someone ejecting gale force winds from their nostrils or they happen to be a mouth breather. It can kill a recording all on its own.
If you have a mic that’s expected to be a few inches from your mouth then it really helps to offset the mic a bit off to the side so your nostril air doesn’t go straight into the most sensitive part of the mic.
The same goes with air exiting your mouth. Having your mic just a little bit offset makes a world of a difference. There’s a thing called a pop filter too to help reduce bursts of air hitting your mic and we’ll talk more about them in the gear section.
We’ll also talk a little bit more about general mic positioning when we talk about gear.
Alien mouth noises can also be an issue. This is where it sounds like you’re positioned inside of someone’s mouth and you can hear every spittle of spit crackle between their teeth or the cilia move in their esophagus every time they swallow.
That stuff is amplified if you have a dry mouth so don’t forget to stay hydrated.
Microphone positioning and your mic’s gain can also play a very big role in this too. If you have a microphone that’s meant to be 3-4 inches from your mouth, don’t put it 1 inch from your mouth thinking it’ll be better. Those few inches make a big difference.
Avoid being a bobble head. It’s really easy to forget you’re recording sometimes and start moving around, especially if you have a standing desk.
If you have a microphone that’s expecting you to be a few inches from it, then moving your head a few inches to the side or back can make a pretty big difference in what you sound like. Especially so if you decide to lean back a lot. Lots of mics are very position sensitive.
Audio Gear and Software
We’re going to cover a lot of ground here:
- Headphones
- Microphones
- Pop filters and plosives
- Microphone stands
- USB audio interfaces
- Pre-amps and processors
- Wires
- Software
- Audio levels
Hardware very much comes down to what your expectations are. Someone who live streams or records video courses is probably going to end up investing more into their set up than someone who occasionally hops on remote calls for work.
But high quality doesn’t always mean expensive. I’ve jumped on calls with clients using whatever built in microphone comes with a MacBook Pro and they sounded pretty good. Not great but not bad enough to be distracting.
Before we cover microphones, let’s first talk about headphones.
See No Evil, Hear No Evil - AKA Headphones
See No Evil, Hear No Evil is a funny Gene Wilder movie if you haven’t seen it. He plays a deaf man. This has to do with recording high quality audio because your hearing plays a very big role in being able to record things accurately.
Headphones make a huge difference and if you can’t hear yourself properly then you might be missing out on tons of audio imperfections and issues.
There’s a world of a difference between something like $30 budget Sennheiser headphones and really good studio headphones. Fortunately you don’t have to break the bank here either while enjoying pristine studio level quality.
Sony MDR V6 / MDR 7506
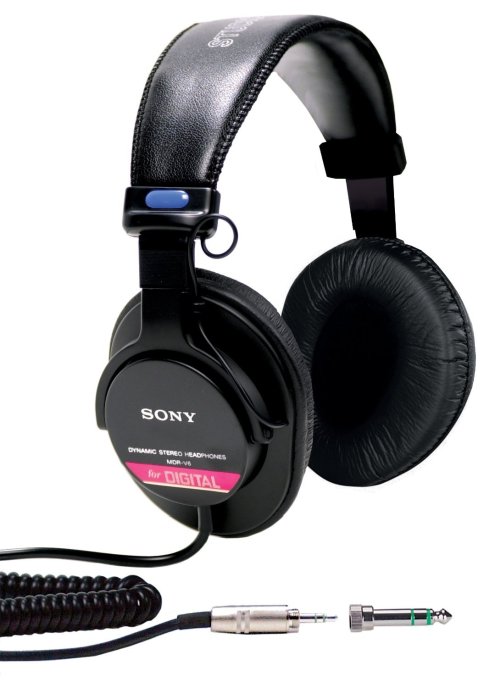
The Sony MDR V6 headphones are by the far the best $80 headphones I’ve ever used in my life and I wrote a massive headphone review post which compares a few pairs.
They are extremely balanced and give you a true sense of what your recording sounds like, and they also sound amazing for music (at least for metal). You can hear the details of everything from the faintest lows to the highest of highs.
I can’t describe them with words, other than if you’ve only used budget headphones or you’ve bought expensive over tuned headphones that jack up the bass then you don’t know what you’re missing. You have to experience it first hand.
The bad news is for some reason since I bought them in 2016, their price went up from $80 to $350. That puts them into a totally different price bracket and I probably wouldn’t pay that much for them today.
Fortunately the Sony MDR 7506 headphones are supposedly similar. I say “supposedly” because I haven’t used them first hand and if you Google around you’ll find some folks saying they are the same except for the plug, and others claim they sound different.
What I do know is, if I were buying headphones today I would buy the MDR 7506. They have an 85%+ 5 star rating on Amazon and tons of studios use them. There’s no way you can go wrong with at least starting by trying them out.
There’s no point even listing other headphones. Feel free to do more research if you don’t believe me or want to explore what’s out there. The MDR V6s might be the highest I’ve ever personally rated any product I’ve ever purchased.
Maybe it has to do with music being a big part of my life so it touches me in a way that a computer monitor and other physical items cannot.
By the way, there’s a deep rabbit hole of using studio monitors instead of headphones for checking your recordings but for most types of home recording such as live streaming, screencasts, podcasts with a guest, Zoom calls, etc. you’ll absolutely want headphones so your speakers don’t echo back into your mic and drive everyone crazy.
Now that we have playback handled, let’s talk about recording.
Microphone Types Based on What You’re Recording
One thing to consider is if you’re going to record video. You might not want the mic to show up in the video frame, or maybe it’s ok to be slightly visible or maybe you don’t care if it’s in plain sight in the foreground. It depends on your style and what you’re recording.
As a quick aside, if you’re curious I use the Logitech c920 webcam ($70 to $80).
Personally I’m ok with showing a little bit of the microphone in my videos. It’s not blocking my face and it’s positioned to give a pretty good balance of quality and being out of frame given the type of microphone I have.
These styles of mics typically come in 2 flavors. Dynamic mics and condenser mics. I prefer dynamic mics, and we’ll talk more about the differences soon.
I think for most programming videos, gaming streams, remote podcasts and things of that nature it’s fine. You’re mainly sitting or standing still and the mic isn’t a huge distraction.
But if you’re moving around a lot, such as doing hardware reviews (ie, Linus Tech Tips), or you typically have a few folks on video at once then you’ll probably want a different type of microphone. Some options are lapel mics (they clip onto or under your shirt), or a shotgun mic (they are above the video frame aiming down at the subject(s)).
This post is going to focus on individuals recording in a stationary place and don’t mind a little bit of the microphone showing show up on video. In some cases you can even make it disappear, depending on how good your room is.
You can always research lapel and shotgun mics somewhere else. I highly recommend Curtis Judd’s videos on YouTube. He has a ton of excellent reviews and really knows his stuff. He also covers lighting and cameras too if you’re into that.
Just be warned that a really good sounding lapel or shotgun mic could easily run you $500 to $1,500 dollars to get a sound that’s similar to a $70ish dynamic microphone.
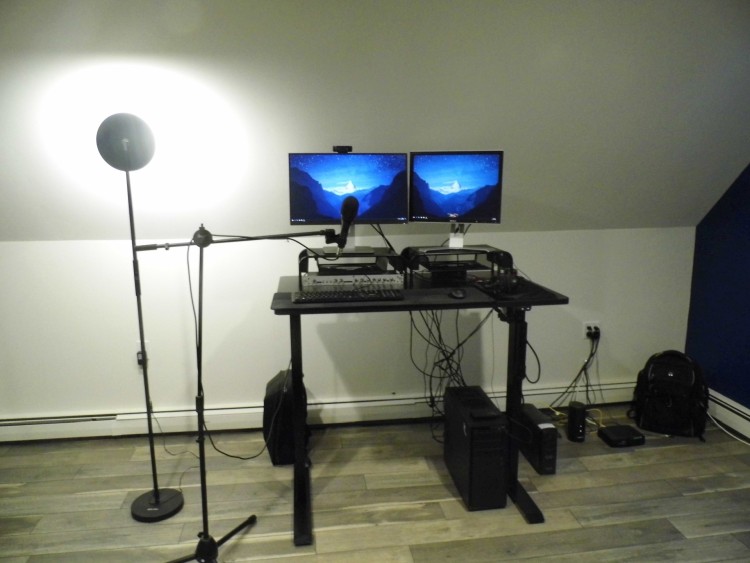
And by the way, if you’re curious what I use for lighting. I have an Albrillo Adjustable LED Floor Lamp ($60). It has a remote control to adjust the intensity and color warmth. It’s also adjustable in height. I’m really happy with it.
Dynamic microphone recommendations (what I use)
Dynamic microphones are really good because they are very position and direction oriented which means even if you don’t have an ideal room you can still get great sounding audio.
Typically they expect you to position your mouth a few inches away from the mic and they do a great job at not picking up sounds that aren’t close to that. For example if it’s summer time and you have crickets outside, it probably won’t pick them up.
It also likely won’t pick up planes or helicopters outside, even sirens to some degree. Mine won’t pick up ambulance sirens that are about 200-300 feet away.
I use and recommend them because most bedrooms or home offices aren’t going to have a ton of acoustic treatments and almost certainly won’t be sound proofed.
The TL;DR on acoustic treatment vs sound proofing
Acoustic treatments are things we’ve talked about already where the end goal is to reduce reverb. As we’ve covered that could be done in many different ways with both common household items and specialized things like acoustic panels.
Sound proofing is blocking sound from entering and escaping a room. Acoustic treatment has pretty much nothing to do with this.
Sound proofing is typically done before you finish building a room because one main way of doing it is to create double walls and filling the gap with thick fiberglass and other materials. Something like this is a big change and will easily cost thousands of dollars.
So that’s why I prefer dynamic microphones. Instead of sound proofing a room, the microphone itself is designed to not pick up unwanted sound to some degree that’s common in typical neighborhoods.
Shotgun mics are also quite good with rejecting off-axis noise and work well in homes, but let’s stick with dynamic microphones for now.
Audio-Technica AT2005 (what I use)
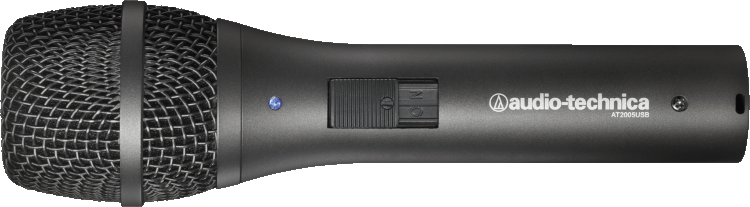
I personally use an Audio-Technica AT2005 which tends to go for around $70-80 depending on the current demand.
It’s awesome for a number of reasons:
- $70-80 is a reasonable entry level cost
- It doesn’t require a dedicated pre-amp to use it because it doesn’t need a lot of power
- It has both a USB and XLR connection (more on XLR later)
- It comes with a long USB cable
- It comes with a very long XLR cable
- It doesn’t weigh much (compatible with a bunch of different stands)
- It comes with a stand (although you probably won’t use this)
- It comes with a clamp to connect to 3rd party stands
- It has an on / off switch (you can flip it off if you’re paranoid)
As for not needing a pre-amp and its low power requirements, let’s talk about that a bit later. But for now understand that alone is saving you about $350.
In my opinion the AT2005 is one the best dynamic mics you can get when you factor in a combination of sound quality, cost and upgrade’ability. The last one is interesting because it means from day 1 you can connect it straight to your computer over USB and if you decide you want more audio equipment later on you can switch over to the XLR connection.
Personally I have it connected over XLR with a bit of other audio gear but that gear is mainly there to help clean up the audio before it reaches my computer. If I had a better room I think I could get by with it straight over USB with no other gear or software modifications.
If you’re curious I recorded my Dive into Docker intro video using this mic straight into the USB port with no additional hardware. I cleaned up the audio with a software noise gate.
To give another example, one of my podcast guests wanted to buy a microphone because they planned to do more recordings in the future.
I recommended this mic to him and he used it in the podcast over USB with no other audio gear and he didn’t even have to mess with his room at all. Here’s a link to that episode at a specific time stamp where I talk for about 30 seconds and then he goes on a long stretch.
I’m jealous because his sound quality is superb. I think he sounds better than me and I didn’t touch his audio afterwards at all. I imported it directly as is.
I think it’s a combination of having a very quiet room and his natural voice’s tone meshes very well with the AT2005. It sounds really balanced. It doesn’t sound thin or too boomy.
That’s an important thing to think about too. What mic sounds good for someone might not sound good for someone else. But I find in general this AT2005 has a good hit rate for sounding good with a wide range of voices.
I’ve had mine since early 2017 and I’m really happy with it. If you’re happy with this mic, you can skip to the next section on stands.
Shure SM7B
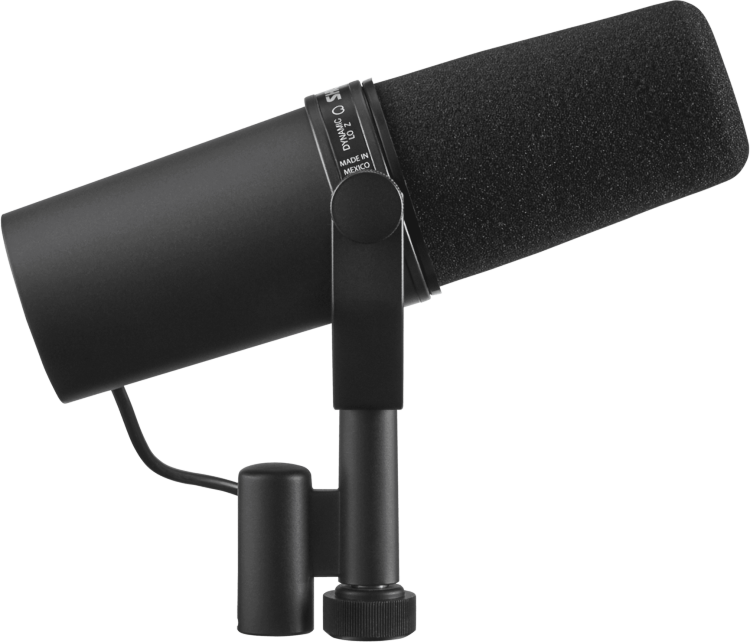
I don’t use the Shure SM7B but it’s very popular in the music industry, podcasting world and live streaming. It usually sells for around $400.
Joe Rogan uses it and I have a feeling lots of folks in the podcast / live streaming industry default to using it because of that, and now it’s gained critical mass where everyone sees everyone else use it so they use it.
That’s not for no reason tho, it’s a really really good microphone. Like the AT2005 it’s a dynamic mic, but unlike the AT2005 it only accepts an XLR connection and it also requires a lot of power to operate it.
That means at minimum you’re going to need a USB audio interface that lets you connect an XLR cable from your microphone to this USB interface which then connects over USB to your computer.
We’ll talk more about that later, but a decent one will run you about $120-180. But its pre-amp isn’t strong enough for the SM7B so you’ll also need more hardware. The best bang for your buck will end up being another $200 since it’ll do more than act as a pre-amp.
But now we’re talking $350 in extra hardware plus the $400 for the mic itself. You’re also going to need a heavy duty boom arm stand which will be about $50.
Throw in sales tax and you’re at ~$900. That’s a much bigger investment than the $70-80 for the AT2005 and in my opinion the SM7B doesn’t sound that much better when someone is casually (but professionally) speaking into it.
One thing that the SM7B has over the AT2005 is it comes with a built in pop filter which helps removes plosives which are words like “popsicle” and “test”. Basically words that cause you to push air quickly out of your mouth.
You can always add a $15 pop filter to the AT2005 or do things to help control plosives in other ways, but I can see why Joe Rogan uses this mic. Having a big pop filter in a camera view can look weird and his guests aren’t professional audio engineers. The SM7B is more forgiving with positioning and does better to reduce unwanted / off-axis sounds.
Still, in my opinion the AT2005 does a great job at rejecting unwanted noise and if you watch a bunch of microphone comparison videos on YouTube by professionals I don’t think the difference is huge when you set both mics up correctly.
With that said, don’t let me talk you out of this mic. If you want to drop $900 for this set up by all means do it. I just think in most cases starting with an $80 mic is a safer bet than spending $900, especially if it’s for a business you’re not sure you’ll be into 6 months from now if let’s say you were starting a podcast or doing YouTube videos, etc..
Or let me put it another way. I could buy the SM7B right now but I choose not to. It’s not because I’m cheap or can’t afford it. It’s because I don’t think it’ll make a big enough difference.
Most listeners won’t notice the difference, and for the 1% who do it’s not like you’re comparing nails on a chalk board vs the most beautiful sound you’ve ever heard. It’s more like having your web server respond in 15ms instead of 20ms.
Tens of thousands of folks have taken my courses. Not 1 person has complained about the audio quality in such a way where the SM7B would have fixed it.
Condenser microphone recommendation
Condenser microphones are really good at picking up sounds in great detail, even very faint whispers. If you have a very quiet room they can be wonderful but they pick up a lot more unwanted noise than a dynamic microphone.
You can use them from a few inches away from your mouth but in a very good room you can keep them as far as half an arm to a full arm’s length away and it’ll still sound good.
Blue Yeti
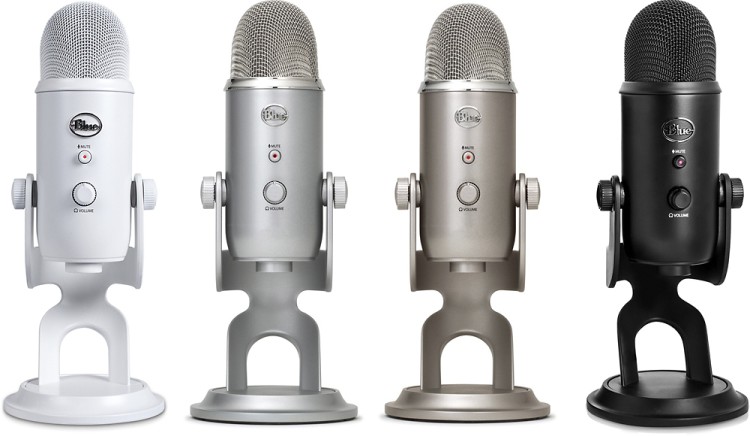
A very popular condenser microphone is the Blue Yeti and it’ll run you about $120-130 depending on the demand.
It connects over USB and the standard edition has no XLR connector, but there is the Blue Yeti Pro that has both USB and XLR connectors for around $170.
For reference I bought the regular model back in 2016 for $120. I used it in 1 of my courses but stopped because it was too sensitive. It’ll pick up a mouse fart from across the room.
It picked up a ton of outside noises. Every plane was picked up, random kids making typical kid noises, etc.. It caused me to have to go back and re-record many lines.
I also had to use a really strong noise gate (software at a time) to reduce my computer fan hum which took away from the natural tones in my voice. Although to be fair back then I had no idea what I was doing with audio and used too many effects overall.
I don’t think the Blue Yeti is a bad mic. If you have a very quiet room and you don’t want to be right on top of the mic it’s a very reasonable option.
With microphones out of the way, let’s talk a bit about optional accessories.
Pop filters? Plosives? Wind screens?
If you read everything up until now, in the Shure SM7B section I mentioned a pop filter.
They help reduce plosive sounds like when you say words like “push” or “breakfast”.
Pop filters work by being positioned in between your microphone and your mouth and they come in all shapes and sizes. They help absorb the air coming out of your mouth produced by plosive words.
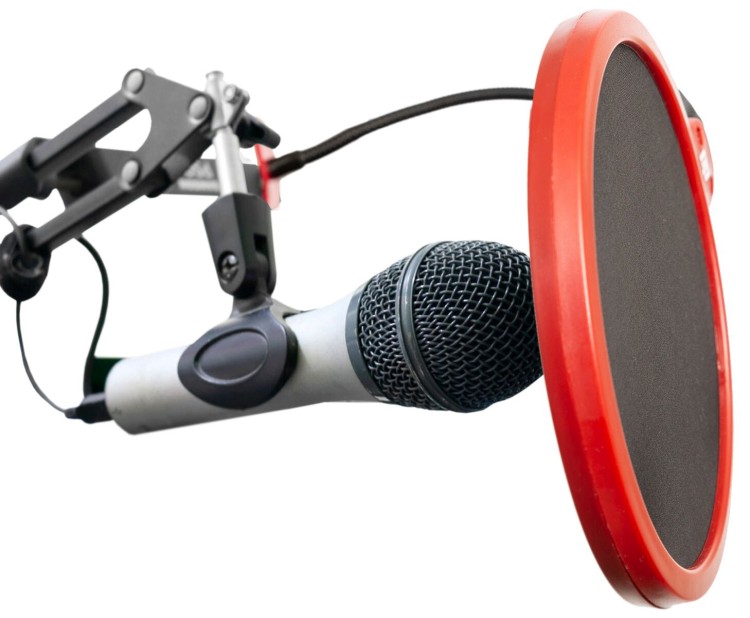
Back when I had the Blue Yeti and I didn’t have a webcam I used the Dragonpad pop filter. It’s around $13 and it easily latches onto most microphones.
It definitely worked but personally I’m not a fan of using one that big when you have a webcam because it’s very distracting. And if you pull the microphone far enough away it gets to the point where having a pop filter makes no difference.
For a dynamic microphone the idea of reducing plosives is very important tho. If I keep my AT2005 directly pointed at my mouth you can very much hear the plosives.
To help combat plosives in a webcam friendly way I’ve done 2 things:
Firstly I positioned the mix slightly off-axis from my mouth. This way the blunt of the air exiting my mouth glances the mic’s most sensitive area instead of being a direct hit.
For a while I used to position the mic way off to the side and that was enough on its own but since then I’ve changed my mic’s position to be even more webcam friendly and I’m limited to only controlling the Y axis instead of the X axis for the mic’s position.
Secondly, I bought a wind screen ($8) to put over the top of the mic. It’s not even flush against the tip of the mic. I’ve left about 1 inch of “puff” there to help slow down the air.
It’s called a wind screen because normally you would use them outside to help reduce the sound of wind hitting your mic, but they work for your mouth’s air too.
It didn’t make a drastic difference but it helped enough to be worth it. It took a bit of fiddling to find a good mic position that helped reduce plosives with that small wind screen.
Microphone Stands and Keyboard Rumble
If you use the built in stand that might come with your microphone, chances are it’s going to be a little tripod that sits on your desk. That’s going to be a problem for 2 reasons.
With a dynamic mic it probably won’t be high enough to be close to your mouth unless you put a few books under the stand. It being directly on the same plane of existence as your keyboard is also going to cause all sorts of issues too.
Vibrations are very bad for recordings and if you have your mic stand right next to your keyboard, then chances are the mic is going to pick up the vibrations when you type. Even if the keyboard keys were magically silent, the vibrations would be very apparent. It would be like a herd of elephants.
A quick hack to help reduce keyboard rumble is to double or triple fold a bath towel under your keyboard. That’ll absorb all of the vibrations. But yeah, this isn’t really a good long term solution. It makes typing weird and it involves a set up / tear down process for recording.
Also as a quick aside, if you have a mechanical keyboard with very loud key caps and you plan to type a lot you may want to consider using quieter key caps. You’ll have to test it out.
Boom arm attached to your desk / wall / shelf
One practical way to get a better microphone position and remove keyboard rumbles is to use an adjustable boom arm. This is where you connect the mic to a movable arm and you can attach this arm to either something not connected to your desk, or a different level of your desk.
This really depends on how your desk is set up. In my old set up I had one attached way off to the side on a different level of a custom standing desk. This also demonstrates how I used to have the AT2005 way off to the side with the Dragonpad pop filter:
That is the NEEWER boom arm and it’s about $14. The AT2005 works great with it but if you have a heavier mic like the Shure SM7B you’ll want to use a more sturdy boom, such as the $35 InnoGear Microphone Arm Stand or whatever you prefer based on this search.
With my new set up this wasn’t an option because I transitioned to a FlexiSpot adjustable / motorized standing desk and it only has 1 desk surface.
A boom arm with its own stand
That lead me to using the InnoGear Microphone Foldable Tripod Boom Stand which is about $20-25. It’s nice because it comes with a few different clamps and it adjusts from 3 to 5 feet (91cm to 150cm) in height and the boom can be extended up to 27 inches (69cm).
It works out nicely because it can be positioned to where you can’t see the stand at all in the webcam’s frame and it can be moved out of the way when you’re not using it while keeping everything plugged in and ready to go.
It takes me a legit 4 seconds to move it into recording position. I also only record while standing up so I’m not always fiddling with its height. I only move it a few feet over when I want to record. Sorry my camera is bad and the lights blew out the exposure.
If you can’t mount a boom arm to your desk or an independent wall then this is a great option if you find yourself typing when recording.
I’ve been using this one for over 6 months and it’s been rock solid in the sense that I haven’t had to adjust the height or the boom pole due to it drooping down on its own. I can’t say for sure if it’ll work well with the Shure SM7B because that mic is a fair bit heavier.
To put things into perspective the AT2005 weighs 9.4 ounces (266g) and the SM7B weighs 1.69 pounds (766g). That is a big difference for something that’s clamped to a thin pole that’s almost fully extended horizontally.
USB Audio Interface
A USB audio interface is a piece of hardware that typically lets you connect microphones and instruments to your computer over USB.
It acts as a sound card device and often has a headphone jack too. Certain models will let you monitor your voice in real time and let you toggle this behavior on and off while still using your headphones normally.
If you have an XLR only microphone this is something you’ll want to buy. It’s compatible with all of the XLR microphones mentioned in this article so far but if you end up using the Shure SM7B you will need to supply it additional power (we’ll cover this soon).
Scarlett 2i2 / Solo 3rd gen
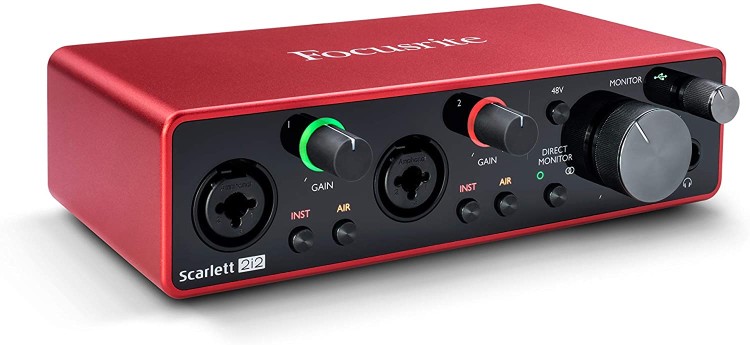
I’m a big fan of the Focusrite Scarlett 2i2 3rd gen USB audio interface. It’s about $175.
A lot of folks use this model. It has a good sounding pre-amp (the thing powering your microphone), it’s easy to control the gain, it supports real time headphone monitoring and the 3rd gen model has a sturdy USB-C connector. Earlier generations were a little flimsy.
It comes with its own USB-C to USB-A cable but it’s only 3 feet 3 inches (1m) long. We’ll talk more about wires a bit later on.
The 2i2 has 2 XLR inputs in case you ever decide to do a 2 person podcast with 2 mics.
There’s also the Scarlett Solo for about $120. It has 1 XLR input jack.
If you happen to be a musician, both the 2i2 and the Solo will let you hook up 1 microphone and a guitar to it which is really nice (I casually play the guitar). Although the 2i2 will support recording an instrument in stereo where as the Solo does not.
But the pre-amp that powers both models are exactly the same which means microphone recordings will sound identical.
At this point if you know for sure you’ll only be doing solo recordings I’d likely grab the Solo. The reason I didn’t is because when I originally bought it during its 2nd gen era there were other differences that made the 2i2 a better choice based on mic quality.
Go use that extra $50 in savings towards something else. :D
By the way, Focusrite (the Scarlett’s parent company) is really nice too. I had connectivity issues with my 2nd gen back before it had a USB-C connector where sometimes the signal would drop and I’d have to plug it back in to fix it.
Even 3 months after the warranty expired they shipped me a replacement. I half jokingly asked them if they could ship me a 3rd gen since it has a much more sturdy connection and without hesitation they did.
Huge shout out to @WeAreFocusrite. My Scarlett 2i2 2nd gen's USB-B connection stopped working reliably and despite my warranty expiring 3 months ago they honored it and shipped a replacement. They even shipped a 3rd gen which uses a more sturdy USB-C connection. Thanks a lot! pic.twitter.com/aTgA2Cf5BR
Nick Janetakis (@nickjanetakis) July 2, 2020
I’ve had the 3rd gen since July 2020 and so far the connection has been super stable. It hasn’t missed a beat. I keep it on 24 / 7 too since my desktop workstation is always on.
There’s other USB audio interfaces out there in the same price range but personally I wouldn’t bike shed over this decision. I spent a lot of hours researching this over the years and it always came back to using the Scarlett. It’s compatible with Linux too!
By the way, with the AT2005 I keep the Scarlett’s gain at about 40%, but this is altered by another piece of hardware I use so don’t take that value as being “correct”. It will depend on a bunch of other variables which we’ll cover through out the rest of this post. I figured I’d add this here because you might wondering what settings I use.
Pre-amps / Processors
A pre-amp is what powers your microphone and a processor allows you to modify your audio in many different ways, such as applying a noise gate to help reduce low volume background noise. But it could also do things like add a compressor, de-esser, basic EQ, etc..
A hardware processor will do all of this in real-time and send the output over to your USB audio interface. From your computer’s point of view the audio comes in perfectly clear and it doesn’t have to do any work. That’s opposed to performing the audio processing in software (more on this soon).
You can buy a pre-amp and processor separately or you can buy them together. You also don’t need either of them if the Scarlett 2i2 / Solo provides enough power to your mic and you have a quiet room to the point where you don’t need a noise gate.
What does a processor do?
Beyond applying a noise gate a processor can do useful things. For example:
A de-esser helps reduce harsh “s” or “sh” sounds when you speak. It reduces sibilance, AKA high frequency sounds. Some folks naturally have more sibilant voices.
An EQ can help raise or lower various frequencies in your voice. If you have a very high pitch voice maybe adding a little bit of low end bass to it will make it sound better.
Although typically the less audio effects you apply the better.
They manipulate and sometimes even remove natural frequencies from your voice and if you go overboard then you can sound very robotic or jagged. It’s hard to describe, but you’ll start hearing weird mechanical wispy sounds and other artifacts.
But when used in moderation they can make a noticeable improvement.
This goes for a compressor too. A compressor will help level out your volume and besides a noise gate I would say this is the 2nd most important thing. If you speak softly it will increase your gain and if you speak loudly it will reduce your gain.
This ensures that folks will always be able to hear you without constantly having to fiddle with their volume and if you get energetic and speak a bit louder it will prevent your audio from clipping. Clipping is what causes your sound to be become distorted.
Applying too much of a compressor isn’t good tho. It can remove tone variance and make you sound a little too consistent / robotic. But a little bit is absolutely worth it.
Now, there’s many other things a processor can do too like add delay, pitch shifting and dozens of other effects but most of these are kind of gimmicks when it comes to recording videos and podcasts. I’ve recorded a few here if you want to check them out.
Plus, those effects are also better suited for being done in software afterwards because realistically you wouldn’t be turning knobs on your processor in real time as you’re recording. Typically you set them once and leave it like that.
As a quick aside, I added an echo once with software in my Dive into Docker course when talking about the echo command. I added a tiny bit of echo during a sentence. About 10 folks have emailed me about that saying they really enjoyed the extra level of polish.
So that’s the basic run down on pre-amps and processors. Let’s go over 1 really good one.
dbx 286s pre-amp and processor

I use a dbx 286s pre-amp and processor and it’s usually around $200-220 and you can either rack mount it or have it sit flush on your desk.
I spent so many hours researching this category of hardware. I probably watched 50 assorted YouTube videos and read hundreds of forum posts on audio related sites. Lots of folks recommend this one and now I see why.
It comes with a pretty good pre-amp that has more than enough power for the AT2005. It should also work with a Shure SM7B but based on the numbers it’ll be close.
With the SM7B you might also look into grabbing a Cloudlifter pre-amp to give you a clean +25 dB of gain. I haven’t tried this personally tho. The dbx on its own might be good enough, so I would experiment with it. You definitely don’t need this with the AT2005.
The dbx also comes with a compressor, de-esser, basic EQ, and a noise gate. It has lights to see how everything is working and it being hardware is nice because you set it once and never have to worry about it again. The knobs are very sturdy too. They take effort to move.
I wouldn’t bother hunting around for another pre-amp / processor if you determined you need / want a hardware processor.
Here’s the exact settings I use, but of course this very much depends on your room quality, microphone and how you speak. Don’t blindly copy the settings thinking they will be ideal for you. For most of these settings going as low as you can is better.

Wires
This is going to be depend on what you decided to buy. We’ll go over which wires to maybe buy and how everything is connected.
USB mic straight into your computer
If you’re going with a USB microphone straight to your computer you won’t need any wires besides the one that comes with your mic, but I would double check the wire length to see if you need an extension cable or not.
Scarlett 2i2 / Solo
The Scarlett comes with its own USB-C to USB-A cable but it’s only 3’ 3” or 1m. This is shorter than you would expect and it’s what you would plug into your computer.
I ended up getting an Amazon Basics USB-C to USB-A 9 feet (2.7m) extension cable for $12. I recommend not going longer than that due to the risk of signal loss.
As for an XLR cable. I used the one that came with the AT2005. If you need to buy one you can grab the Hosa XLR microphone cable 10 feet for $15.
Hosa is a really good brand for audio cables. Lots of folks recommend them and they are highly rated. Most really expensive cables are more durable, which is handy if you’re constantly unplugging and moving them around. Hosa is fine for cables sitting in your room.
If you’re not using the dbx you can connect your mic straight to the front of the Scarlett with that XLR cable.
Scarlett 2i2 / Solo + dbx 286s
You’ll still only need the 1 XLR cable which is covered above, but now you’ll also want to get a Hosa 1/4 inch TRS balanced cable 10 feet.
Everything will be connected like this:
- Microphone (XLR cable - bottom) connects to the back of the dbx 286s
- dbx 286s (TRS cable - back [output]) connects to the front of the Scarlett
- Scarlett 2i2 / Solo (USB cable - back) connects to your computer
The TRS cable is interesting because you wouldn’t think it would plug into the front of the Scarlett but it does. That XLR jack in the front is made for both XLR and TRS connections. As far as I know (I’m not an audio engineer) it’s the same cable. XLR vs TRS is the connector.
Cloudlifter
I don’t use this personally (just a reminder in case you’re skipping around).
But if you happened to also get a Cloudlifter, it would go in between your mic and the dbx. You’ll need 1 extra XLR cable and you can get the same one linked before. If you don’t have a dbx then it goes in between the mic and the Scarlett.
Software
We’re not going to spend a huge amount of time here.
This is just to bring an awareness to why you might choose to do things with hardware, or maybe how you can avoid all hardware besides a USB mic and do your processing through software depending on what you’re doing.
The first thing is figuring out your priorities and your life style.
If you’re always on the move then lugging around a bunch of hardware probably isn’t worth it, especially if you’re a light packer. Dedicating 30% of your backpack to a carefully packed Scarlett + dbx 286s and a bunch of cables doesn’t seem worth it.
But if you plan to record in 1 location then the hardware option might be worth it.
Let’s break down a few scenarios where you might want high quality audio:
- Live streaming to Twitch, YouTube, etc.
- A live talk over Zoom / equivalent for an interview, code pairing, etc.
- A pre-recorded video for YouTube or courses (aka. you have a chance to edit it)
- A pre-recorded podcast (live would probably be done over Twitch, YouTube, etc.)
- Calling your friend with whatever app you decide to use (Google Meet, Skype, etc.)
I would argue that you could technically use software to process your audio in all of the above use case, especially if you have a quiet room.
Before we address hardware vs software processing let’s talk a little bit about how you might record your video and audio because that plays a role here.
A few tools to record audio and video (some free, some paid):
OBS (Open Broadcaster Software) is a great free and open source cross platform tool for live streaming and recording. It has options to add audio effects like a noise gate and more and it can be applied in real-time even for live streams.
You can even use VST plugins. Those are highly optimized audio plugins written to work with many different applications. There’s a bunch of free VST plugins that provide various processor effects if you Google around.
But chances are the built-in filters that come with OBS will be good enough if you decide to do your processing in software.
What’s nice about this is you don’t have to waste time fiddling with anything for every recording you do. It’s all ready to go just as it would be if you were using hardware.
Personally I record all of my videos using OBS, but I don’t use it for processing. It’s an awesome tool just for recording your screen with a webcam and doing live streams.
Camtasia ($249) / Screenflow ($129) are both video recording and editing tools. They’re useful for creating any type of pre-recorded videos where you’re recording your screen with a webcam. Both of them come with audio filters to help with noise reduction.
Camtasia works on Windows and macOS where as Screenflow is macOS only.
I personally use Camtasia to edit all of my videos. I don’t do any processing with it, but it makes it painless to do stuff like noise reduction if you had to. All I do is import the videos I recorded with OBS and go straight into editing.
I heard Screenflow is even better for audio processing because it support VSTs where as Camtasia does not, but if all you need to do is remove noise and compress your audio to level it out then Camtasia works great for that.
In both cases you’ll find yourself applying whatever audio effects you need to every track. It’s not the end of the world but it does take time. You could always record with OBS to bypass this issue too.
DaVinci Resolve is a free (and paid) cross platform video editing tool that includes Linux support. It has a ton of fantastic audio processing capabilities along with being a very good video editor.
I’d like to switch to it but my 6 year old workstation doesn’t agree with it when it comes to video editing. I get all sorts of weird audio / video artifacts when I export mp4s.
In any case, it’s a top notch tool if it runs well on your hardware. I actually use it to edit all of my podcasts because the way it visualizes the waveform (the visual presentation of sound) makes it so easy to zoom in and cut things around.
Audacity is a free and open source cross platform audio recording tool.
This is the tool I use to record my podcasts, and it’s what I recommend to guests because we both record our own side of the conversation using this tool while we use Zoom to have a real time conversation.
Audacity also has a bunch of audio processing capabilities but I wouldn’t get too used to using them because you need to apply them to every recording. It gets kind of tedious.
I just import these recordings into DaVinci Resolve and edit the podcast there. I leave my track alone since it’s already in good condition and then I clean up each guest’s track in Resolve with a noise gate, compressor and so on. It usually takes about 15 seconds.
Should you use hardware or software processing?
Depending on what you’re doing, in a lot of cases OBS is all you need and it can be done in an equally convenient way as hardware. In other words you don’t need to spend time adjusting every video you record.
If you have a decent computer it won’t be an issue, even if you’re streaming most video games. I’m bringing that up here because when you do it at the software level your computer is doing all of this work instead of a dedicated piece of hardware.
Audio latency is a very noticeable thing. Even something as little as 10ms would be noticeable for a speaking voice, and single digit milliseconds is noticeable for instruments.
If your computer is too slow to process these effects you’ll end up getting all sorts of audio distortions like pops and clicks that you can’t edit out if they happen while you’re actively talking.
But CPUs and other electronics found in a computer are getting really good nowadays. If you’re doing a small amount of compression along with a noise gate while recording your screen with a webcam I think you’ll be fine. I know I was with my workstation that I built in 2014 when I used software processing.
The only time where hardware really wins is if you want to jump on ad-hoc calls with someone using Zoom or other apps. Your audio quality won’t be as good since nothing will be processing it.
That might be ok since the demand for high quality audio isn’t really there. Also, Zoom does minor clean up. Plus you’re dealing with audio over a network so it’s not going to sound amazing anyways. That’s why I record my podcast with local tracks.
Technically you could even install a virtual audio interface (software) at the OS level, process your audio in real-time using a DAW (Digital Audio Workstation) such as REAPER and then send the output of that to any app you want.
That output becomes your microphone input through that virtual audio interface. This is what I used to do in 2015 but it’s tedious as hell because you have to run these things and make sure everything is patched through correctly every time you use it.
That’s originally why I got the hardware I did. It was so I could set everything up once and then just use my microphone in any app and have it sound good without having to mess around with virtual audio interfaces.
At the time OBS wasn’t as good as it is today. If I were starting from scratch with what I know today, I’d at least begin with the AT2005 mic over USB with no hardware and see how that goes with OBS doing the processing for all of my recordings and live streams.
Then I would play it by ear based on what I was doing and introduce the Scarlett 2i2 and dbx 286s if I deemed it necessary.
Audio levels
Great, you’re almost at the end. You have your room worked out, background noise is under control and you have the hardware / software you want.
The last step is making sure your audio is set for a specific loudness.
For example sound is measured in decibels. It’s common to keep your recordings around -10 dB in their levels. That will ensure it’s loud enough for folks with a huge range of devices and you stay clear of going past 0 dB. Anything above 0 dB is when you start clipping.
Typically you adjust the gain on your microphone, pre-amp and software until you see your recording app’s levels consistently jump around -10 dB and peaking at about -6 dB. You can go a little louder too, such as -3 dB. Just make sure you stay under 0 and are consistent.
This is something you’ll want to experiment with until you get used to your voice and what levels it produces with whatever gear and processing effects you have applied.
For playback, just remember that not everyone is using high quality headphones with a dedicated pre-amp. What sounds painfully loud during playback for you might be normal for most folks.
Have trust in the decibel numbers. If you go too low then folks with low powered earbuds or speakers won’t be able to hear you even at 100% volume on their end. Where as you can always lower your playback volume (independent of recording) if something feels too loud.
On that note, be careful with your ears. Try not to listen to things at super loud volumes.
Practice, Practice, Practice
All in all once you have everything under control nothing beats practice and understanding both your own patterns and your microphone’s characteristics. Eventually you’ll figure out what works and what doesn’t work. At least now you know what to tweak.
Needless to say audio in general is a really deep rabbit hole and it can get addicting to always tinker with your settings and gear. I highly recommend finding what works for you and keep it at that until you have a real reason to switch to something else.
I hope you enjoyed this post. It was really fun writing it. Out of 486 posts, this is the longest individual post I’ve written sitting at about 11,500 words + the ~90 minute video that went with it.
What are your favorite recording tips? Let us know below.